Monday 25 August 2008

Rear bed frame


This shows the framework my brother built for me round the air-con unit and also shows the Calorifier I mounted on the wall, the floor under the calorifier will house the water pump, valves for the heating and other water related items. This area is surrounded by a tray like feature that means if there is a leak it drains through the floor and not into the living area, as the hot water will be about 80deg it is probably a good idea. It also shows the two main supports for the rear bed, this again will be slatted and ventilated so we don't need to prop the matress up to breathe. The size of this frame fits a standard 3/4 double mattress. This will probably be more comfy than my bed at home :)

Bed Base


This shows the pull out sofa bed in the bed position. The overhang is completely self supporting, no need for legs or slide outs that scratch the floor, I have tested this and it will support 1 large person easily on the edge. The unit gives a big enough occasional bed and also space to walk between the sofa and what will be the kitchen area allowing access to the main fixed double bed. As the bed is slatted like a domestic version it is very comfortable and we have tested it with domestic sofa cushions with a favourable result.

Sofa base


The picture shows the slatted sofa base, this is designed to give the same comfort as a standard domestic sofa. The slats are spaced to allow ventilation of the cushions. The wood used is sufficently flexible for a comfortable seat and also to support 3 people sat next to each other. In this position the sofa takes up minimal floor space (Approx 50CM from the side wall) and in the next post it will expand to create a spare bed.

Seating Area


This shows the sofa base that we have constructed. It contains the battery box which is air tight so the gasses made when the batteries charge are directed in to the exhaust conduit which runs to the rear wall of the van and outside. The pipe can be seen in previous posts continuously rising to allow the gasses to escape. There is also a storage box in the curved end of the sofa for storage. The other part of the sofa around the wheel arch is at the moment a spare area not decided what to use it for. The front of the sofa base will be carpeted the same as the walls.

Saturday 2 August 2008

Air Con


This pictures the Truma airconditioner next to the hot water cylinder, the Air - Con is fitted and working but the cylinder is just placed where it will go, everything has to be boxed in. The two items are located underneath where the permanent double bed will be, on the foam you can see the bottom of where the matress will be.

Water Tank


This shows the main watertank fitted between the two chassis rails along with my dad we fabricated a set of solid steel mounting brakets, 4 in total to support the weight of the water (240kg) when full, I then test drove it full with no problems. This tank will supply the drinking and shower water to the camper. There is a seperate water tank for the waste water on the offside shown earlier.

Lights


I have decided on Cold Cathode lighting for the van based on reccomendations from the SBMCC (Link at the bottom of the page) However I couldn't live with anything surface mounted, due to my height, (Need to stand up anywhere in the van) so I fabricated a recessed fitting to hold 4 x CCFL tubes, wired in series to wokr from the 24V battery setup. Heres a picture of it being made and one fitted.

Panneling


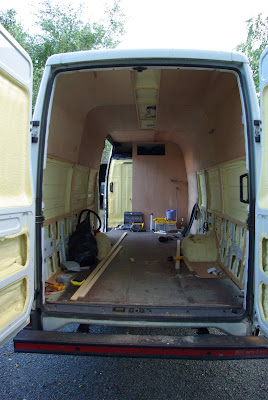
Ok these pictures show the panneling that covers the inside of the van which will be finished with some form of carpet or fabric, to be decided later :)
The foam you can still see is where the head / foot of the bed will be, I'm quite tall and will need to be able to lie out flat, the Spray foam guy just put a smooth flash coat on to stop condensation but i'm going to cover in the wall fabric later. The recess gives me enough room for a standard 1900mm long matress.

Update!!!


Well I have been away on holiday, and luckily took the van to work on in the sunshine for 2 weeks, I got a load of stuff done, but came across some tough problems :(
Anyway this post is showing the Battening for the ply lining, also shows the grey vent tube for the hydrogen released from the batteries during charging, this is vented through the OEM vent on the side of the van tha I adpated.